
- PirateDiffusion
- Guides
- What is a Sampler in Stable Diffusion?
What is a Sampler in Stable Diffusion?
·
Introduction to Stable Diffusion Samplers
If you’re a casual user who just wants to create images easily and change the art styles, you can safely skip the samplers lesson. But if you’re a Stable Diffusion enthusiast that’s trying to squeeze higher quality and more control over your images, you’re definitely in the right place. Samplers are a part of the diffusion software that peel the curtain how the magic works. Let’s start with this clever diagram from Andrew Wong’s blog:
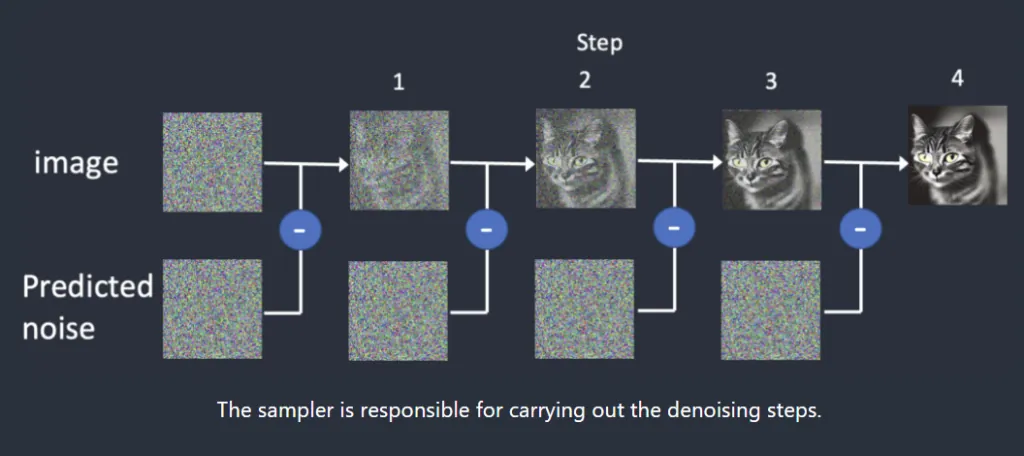
“To produce an image, Stable Diffusion first generates a completely random image in the latent space. The noise predictor then estimates the noise of the image. The predicted noise is subtracted from the image. This process is repeated a dozen times. In the end, you get a clean image.
This denoising process is called sampling because Stable Diffusion generates a new sample image in each step. The method used in sampling is called the sampler or sampling method.”
What’s the best sampler for Stable Diffusion?
It’s a touchy subject among weebs, perhaps it’s best if you experiment yourself. There are many comparison images and videos at the bottom of this page.
To see a list of samplers in PirateDiffusion, type this command:
/sampler
Here are some very opinioned reviews to arm you with a general sense of what each does:
Scheduler
Command
What each scheduler (sampler) does and why it’s popular
DPM ++ 2M
Karras*
/sampler:dpm2m /karras
The latest, and recommended for most users creating realistic images.
The DPM++ 2M sampler has an alternate operating mode called Karras that squeezes a little more detail out of this multi-step scheduler. The /karras parameter turns it on.
DPM++ 2M
/sampler:dpm2m
Same as above: DPM stands for Diffusion probabilistic model solver. DPM++ 2M is a popular choice for creators seeking the highest level of detail, and has a Karras mode (above).
UniPC
/sampler:upms
A great one all around. Compared to other samplers at 50 steps, UniPC can create a similar image in just about 25, so your images appear faster. This also has a /karras mode
DDIM
/sampler:ddim
A good general use sampler, and still reasonably fast. Very reliable, consistent but simpler results by 2024 standards.
K EULER ANCESTRAL
/sampler:k_euler_a
The unpredictable one. The _A at the end refers to “Ancestral Processing”, a which is a process of producing samples by first sampling variables which have no parents, then sampling child variables. Use this chaos sampling when all you want is more variety.
K EULER
/sampler:k_euler
The original K Euler is fast, but the results are simpler. It is perhaps comparable to DDIM, in many cases producing very similar results. This also has a /karras mode
HEUN
/sampler:heun
Heun is often regarded as an improvement on Euler because it is more accurate, so you’ll get more details but runs twice as slow. This also has a /karras mode
LCM**
/sampler:lcm
LCM is a special case — it can produce images with very low steps and guidance with slight tradeoffs for precision or quality, but is by far the fastest sampler around. To make it work, also add lower guidance and steps like this:
/guidance:1.5 /steps:6 /nofix
LCM stands for Latent Consistency Model and is built for fast inference, with as little as four to eight steps. We did a whole video about it, check it out
The /nofix in the prompt example above turns off the SDXL refiner, for brighter colors! It’s not required, but this combination may give you a more pleasing result.
How to compare samplers
Set a seed value and guidance to the exact same numbers, and allow at least 3-5 images. For example, here we are comparing DPM2M with and without the /karras variant using the model <sdxl> and the SDXL refiner at full crank, for full control. Right away, you can see the light is more natural with /karras enabled, and the image is a bit better lit.
Is the composition more pleasing as well? Subjective — The decision to interpret “beautiful” as long flowing hair is not something you’d expect a sampler to do, and that’s really the fun of toying with these enthusiast-class parameters. We offer a few more comparisons below.
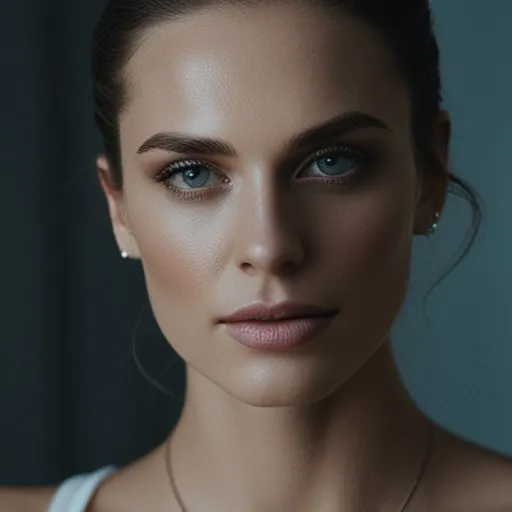
/render /seed:123456 /guidance:7 /sampler:dpm2m a portrait of a beautiful woman #sdxlreal
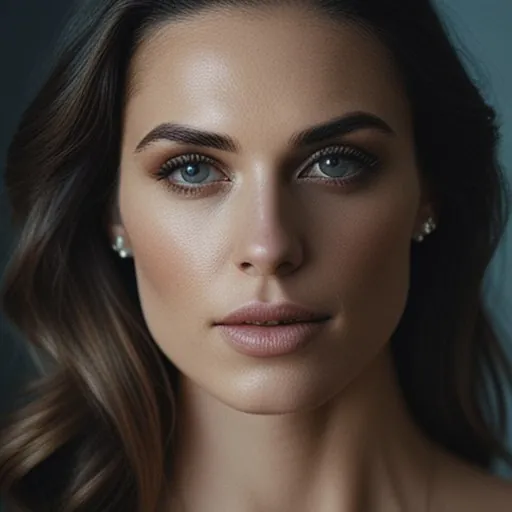
/render /seed:123456 /guidance:7 /sampler:dpm2m /karras a portrait of a beautiful woman #sdxlreal
** VIDEO: HOW TO USE THE SPECIAL LCM SAMPLER
Controlnet and LCM Sampler, plus $200 giveaway - Ep 4!
Deeper into the tech
To better understand samplers, you must first understand how the diffusion process works. Think about a blurry image, and how your eye gradually brings it into focus. Computers do the same with diffusion: the general information is stored as noise, literally colorful dots that don’t make sense to the human eye. Consider this image:
A sampler can process that noise and “focus” it into a photo. The sampler comes into play at the denoising step (bottom left)
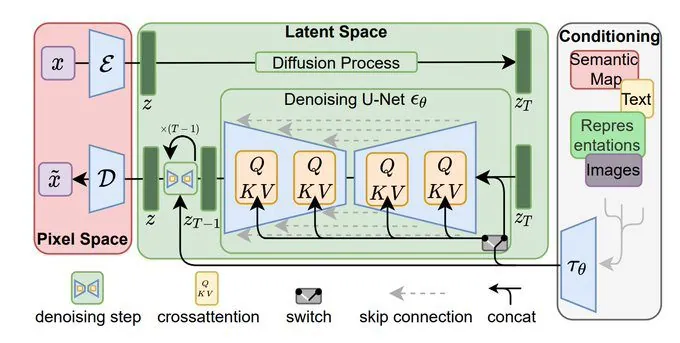
In other words, Diffusion models learn how to remove noise from images, paired with a description of the image, as a way of learning what images look like, and then to generate new ones.
But how do you go from pure noise to an image *exactly*? There are many answers to this question, and thus, resulting in thousands of different samplers available online. Thousands!
Comparisons
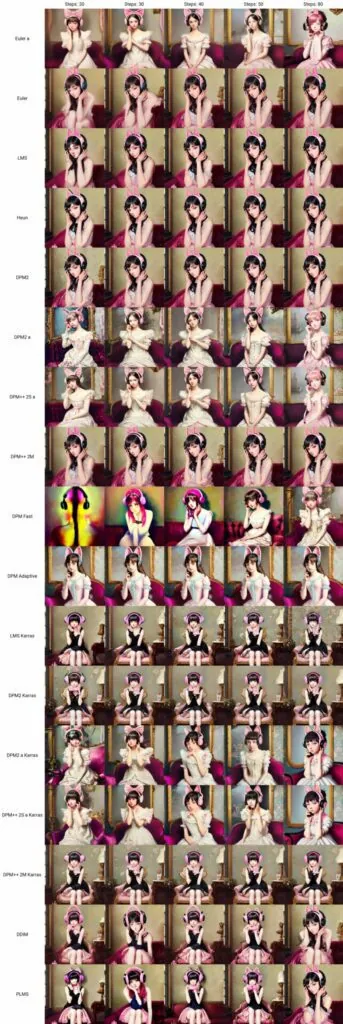
Can’t we just create a chart that compares each one? Remember – it varies greatly by prompt, so any chart we create would be inconclusive: What looks good in one prompt may look worse in a different prompt.
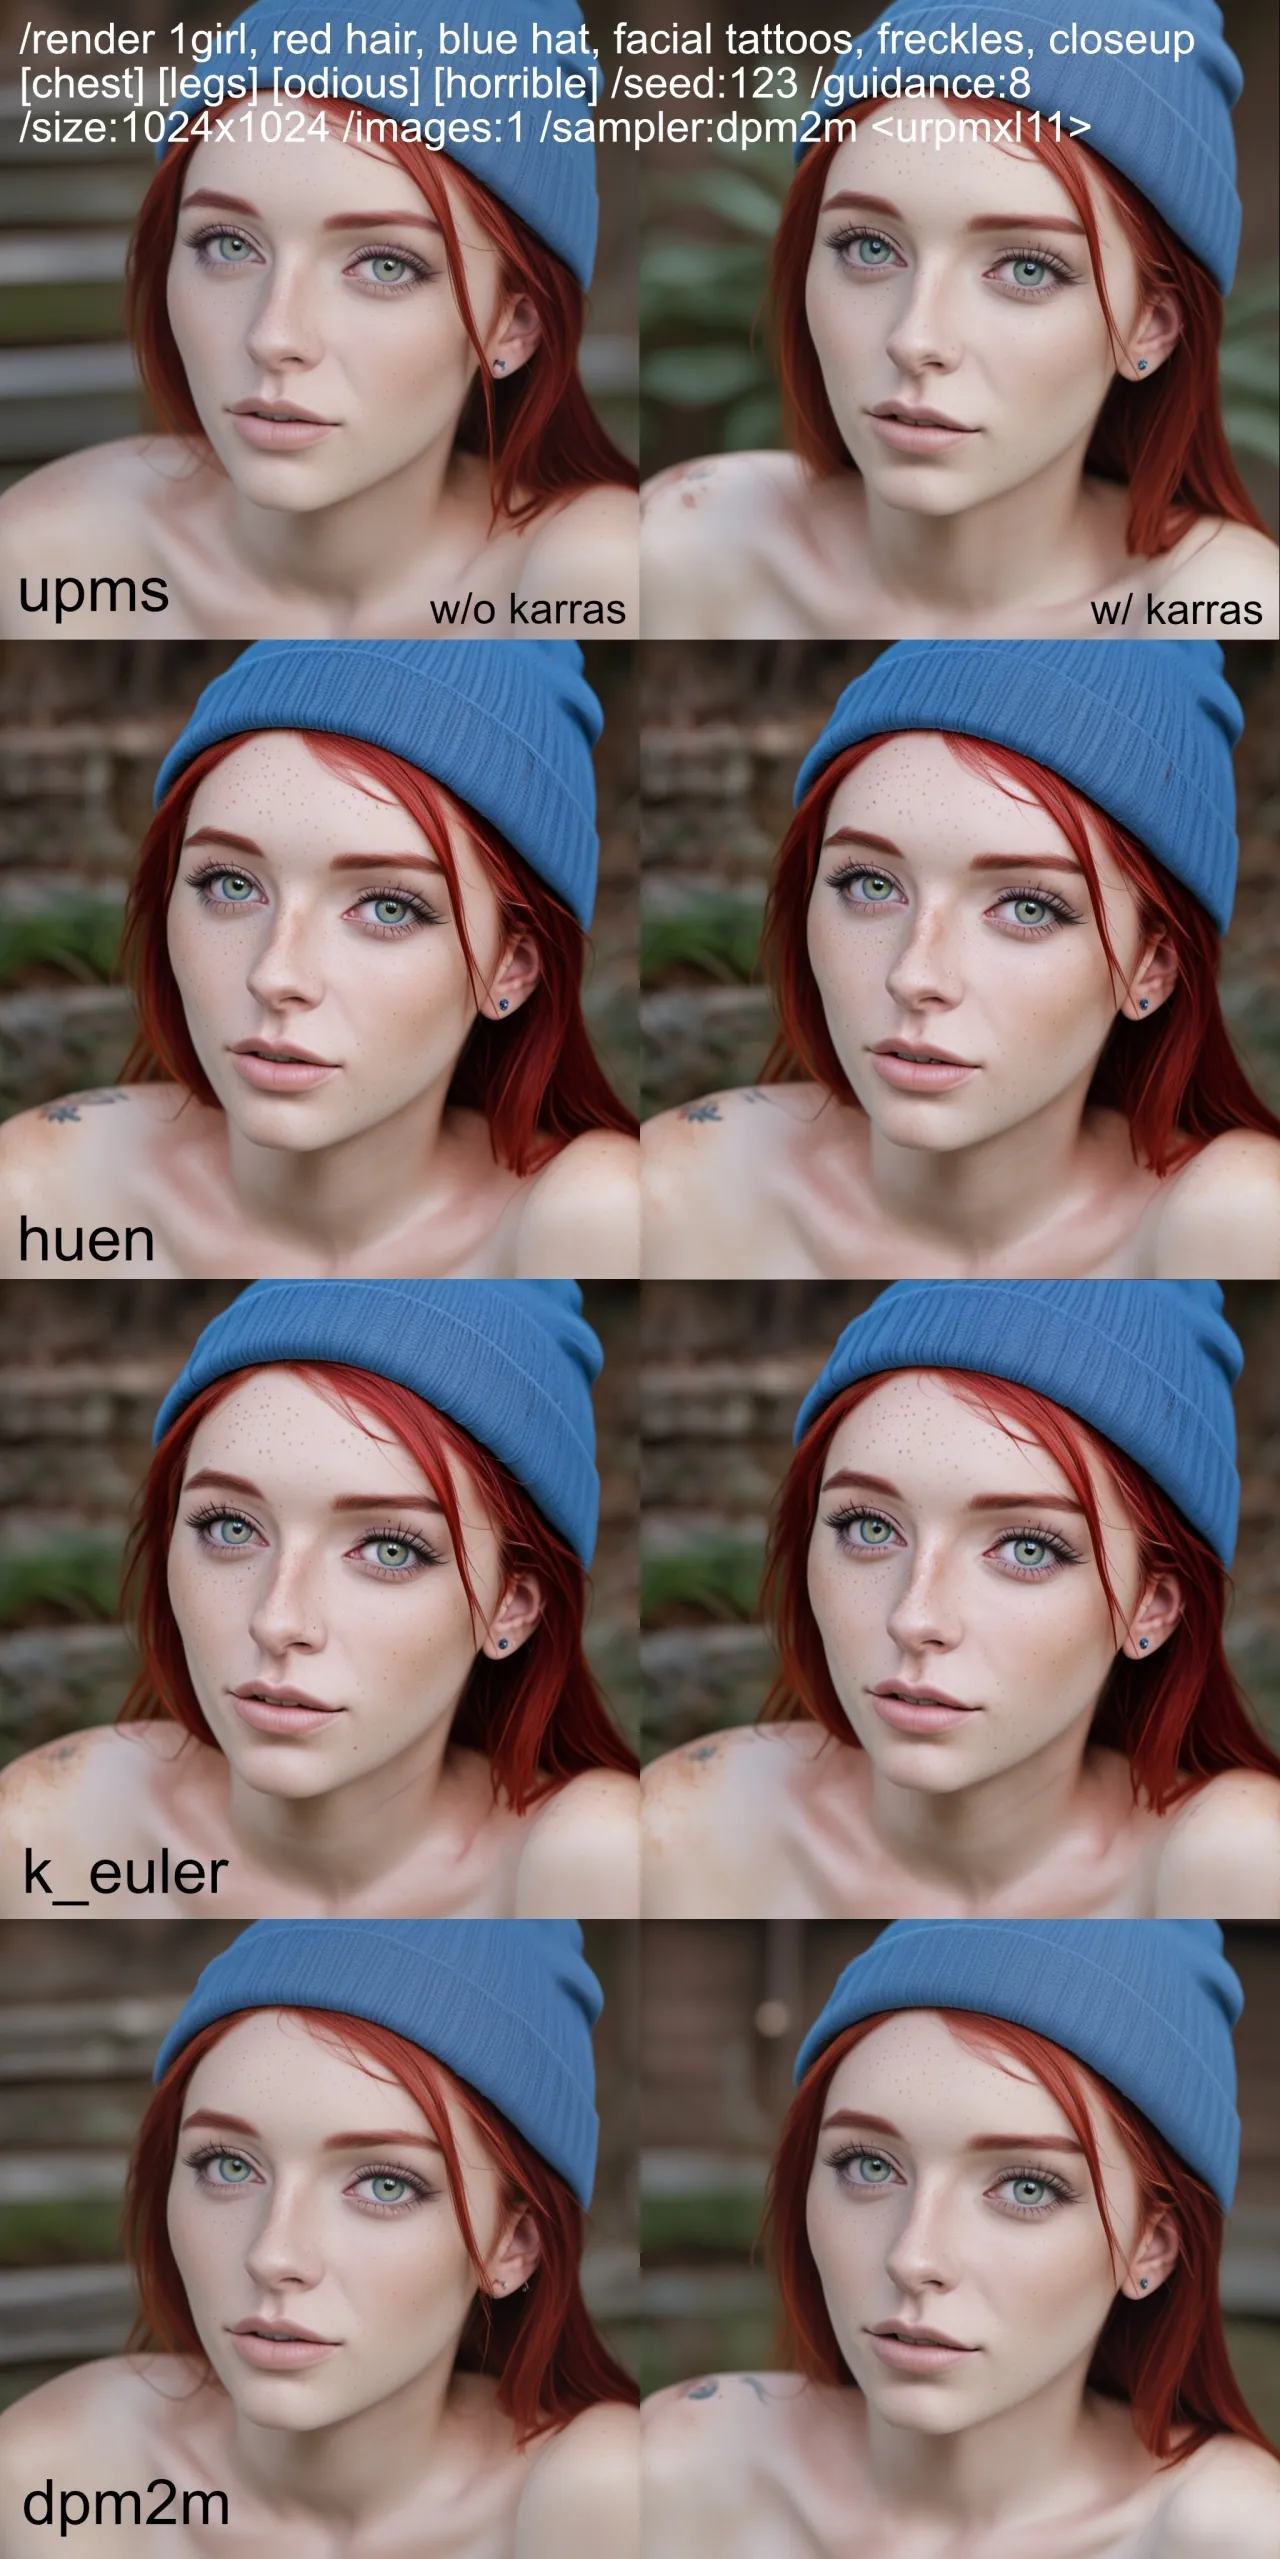
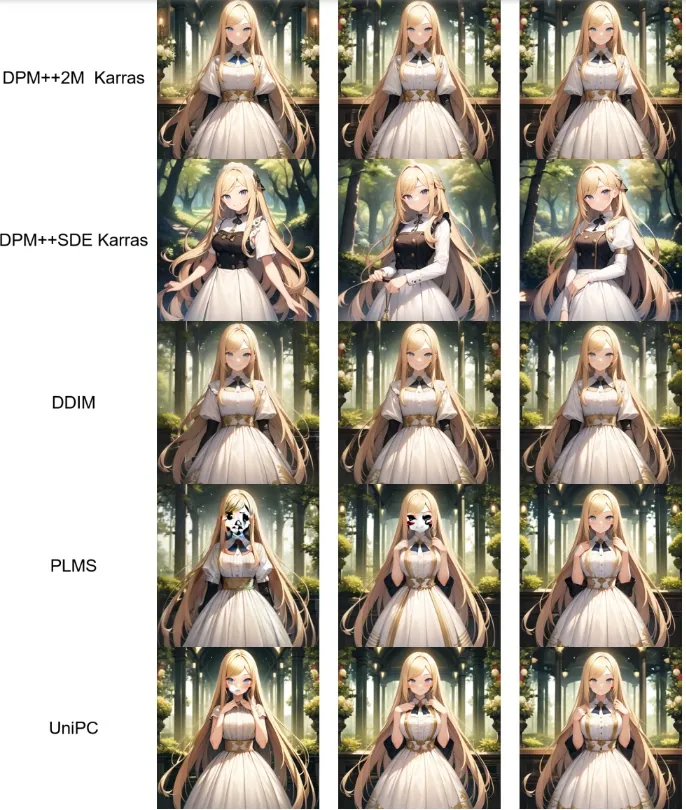
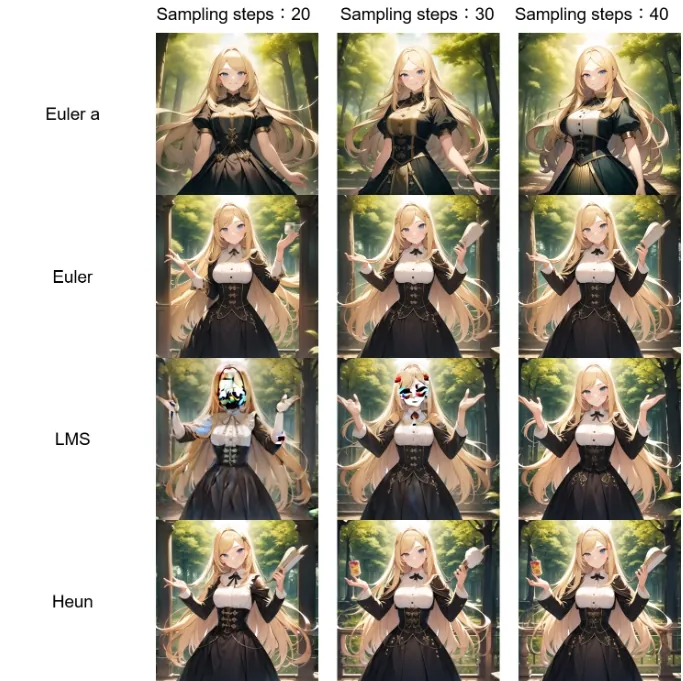
The verdict is not out on that topic, and there is much debate about it online. Here are more comparisons with some unsupported or older ones. The big takeaway here is that you can save time and money by reducing the step count by working with a more “creative” sampler and get similar results.
Pictured below: /steps:20 /steps:30 /steps:40
These examples are older, from 2023, but still pretty interesting:
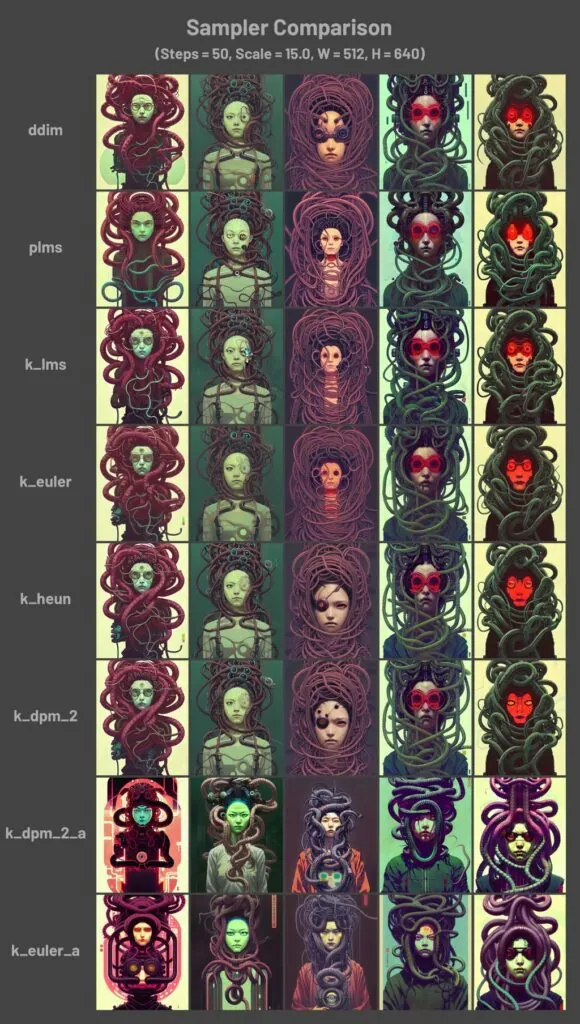
For this specific prompt — Some samplers can do gentler details than others, like hair, eyes, and so forth… but that same sampler may not be as good for a building. If you have the free time, it’s a super interesting toy to play with. If you are in a hurry, just pick the one you like and add more steps and you can get similar results.
There are tons of comparisons at higher resolutions on google if you want to become a samplers savant. People make really detailed charts!
Go further: You can combine these with other techniques for a more striking image, such as SDXL /vass or one of our Upscalers
What is a Sampler?
Note: We’ve moved the Seed FAQ to its own page
Overview
Samplers are a crucial part of diffusion software. They’re also called Noise Schedulers. Each sampler represents a novel computational way of coming up with an image, meaning there is no wrong answer. That said, switching samplers with the same prompt will produce a slightly different image. Not dramatically different, like switching concepts, but different nonetheless.
If you’re already feeling lost, that’s normal! This is deep AI geek territory.
In fact, it’s perfectly safe to turn around right now and never learn about samplers and still enjoy AI images, as this is typically something that runs in the background without your knowledge, and we set the best one automatically for you in recipes.
But if you’re curious, read on, it’s interesting!
Ancestral? Non-Ancestral?
Samplers help determine the composition of the image. It is the part of the software that decodes the image from pure random noise, guided by the trained model (concept), to bring the image together.
You might notice that some samplers end in A like K_Euler_A. This refers to “Ancestral Processing”, a which is a process of producing samples by first sampling variables which have no parents, then sampling child variables, hence the name. This process has been described as “chaotic” and can produce different results than non-ancestral types, depending on how many steps you choose.
To look up a quick list of samplers in our software, simply type (plural)
/samplers
The supported samplers are returned. The list that looks like this:
ddim, dpm2m, k_euler_a, k_euler, heun, upms
But which one should you pick, and which ones are available?
Recommendations
At this point you’re probably panicking and just want someone to tell you which sampler to use. We get you. But we also have bad news. To make matters worse, samplers react differently to different kinds of images.
Specific to creating people, animated or realistic, it is the sole and unscientific opinion of Morgan in our VIP tech support that these guidelines may help:
| upms | Recommended for most people – best all around. Short for UniPC, it produces excellent results in less steps. |
| dpm2m | Highest quality, but slowest. DPM++ 2M Karras is recommended for anime models, but it is a few seconds slower per image. Worth the wait, imho. |
| k_euler_a | The creative, unpredictable one. This is an ancestral type, meaning it’s going to take a different approach than the others, likely resulting in a very different image. |
| ddim | A good general use sampler. It used to be the fastest before upms. Very reliable, consistent results. |
| k_euler | One of the simplest and thus one of the fastest, but don’t expect many details. A solid choice to build from. |
| heun | Heun is often regarded as an improvement on Euler because it is more accurate, so you’ll get more details but runs twice as slow. |
| klms | We retired this sampler, as it was not performant with higher resolution models at high guidance. RIP. |
EXAMPLE USAGE
/render /sampler:ddim and then your prompt goes here
Tip: You can also type /settings to set your favorite, and it’s always set
The number of steps and which sampler to choose is a hot topic of debate. It’s very subjective, as long prompts can be so different from one another.
When rendering other objects, such as cars and especially complex structures like buildings, this table might send you off in the wrong direction. Please do try them all and let us know your opinions in our Just Chatting group. Do feel free to challenge the advice on this page, as we want to make this page more useful.
Which Stable Diffusion Sampler is Best? - Comparison With Step Counts
Deeper into the rabbit hole
To better understand samplers, you must first understand how the diffusion process works. Think about a blurry image, and how your eye gradually brings it into focus. Computers do the same with diffusion: the general information is stored as noise, literally colorful dots that don’t make sense to the human eye. Consider this image:
A sampler can process that noise and “focus” it into a photo. The sampler comes into play at the denoising step (bottom left)
In other words, Diffusion models learn how to remove noise from images, paired with a description of the image, as a way of learning what images look like, and then to generate new ones.
But how do you go from pure noise to an image *exactly*? There are many answers to this question, and thus, resulting in thousands of different samplers available online. Thousands!
Comparisons
Can’t we just create a chart that compares each one? Remember – it varies greatly by prompt, so any chart we create would be inconclusive: What looks good in one prompt may look worse in a different prompt.
The verdict is not out on that topic, and there is much debate about it online. Here are more comparisons with some unsupported or older ones. The big takeaway here is that you can save time and money by reducing the step count by working with a more “creative” sampler and get similar results.
For this specific prompt — Some samplers can do gentler details than others, like hair, eyes, and so forth… but that same sampler may not be as good for a building. If you have the free time, it’s a super interesting toy to play with. If you are in a hurry, just pick the one you like and add more steps and you can get similar results.
There are tons of comparisons at higher resolutions on google if you want to become a samplers savant. People make really detailed charts!
If you’re feeling exhausted at this point, we feel you.
Just set your sampler to upms and call it a day, it’s very fast and looks great. Or dpm2m if you do anime stuff, as that’s the most frequently recommended by weebs. We’ll keep this page updated as we study them and add more.