Announcements

How to use FreeU in Stable Diffusion with PirateDiffusion

How to use FreeU to boost image quality

FreeU is a simple and elegant method that enhances render quality without additional training or finetuning by changing the factors in the U-Net architecture. FreeU consists of skip scaling factors (indicated by s1 and s2) and backbone scaling factors (indicated by b1 and b2).

Skip factors 

a) Aim to minimize texture over-smoothening
b) Helps to preserve details in image render

Backbone factors

a) Amplifies the feature map of the entire render
b) Lead to over smoothening of textures
c) Generates more vivid details and improves image quality

Therefore in their paper, a balance between the skip scaling factors and backbone scaling factors is essential in ensuring a good render. To find more details about FreeU,
you can click on the link here: Link

For our platform, we use the following command to call for FreeU with the following factors:
/freeu: s1, s2, b1, b2

By default, we recommend the following values of s1,s2,b1, b2 for:
– SD 1.5: s1 = 1, s2 = 1, b1 = 1.2, b2 = 1.2
– SD XL: s1 = 0.9, s2 = 0.2, b1 = 1.2, b2 = 1.4

Take note for both scaling and backbone factors, the range is between 0 and 2.

In summary from our testing, we can recommend the following (If your lazy to read through the X-Y plots):
– Adjust b1 and b2 based on your preference to get the specific feel and detail required from 0 – 2
– Adjust s1 and s2 between range of 0.8 – 1.5 (up to 1.6) to get the right colour contrast and saturation.
– Take note your values will vary depending on model and lora/embeddings used.

——————————————————————————————————————————–

In this testing, we will showcase the power of freeu using the following prompt:

/render /size:768x768 /seed:1 /guidance:7 /sampler:dpm2m /images:2 1girl, half body shot, maid outfit, posing on shopping street , /freeu:s1,s2,b1,b2

We will be changing one set of scaling factors, either the skip and backbone and keeping the other constant to understand what happens.

If you’re ready, let’s go!


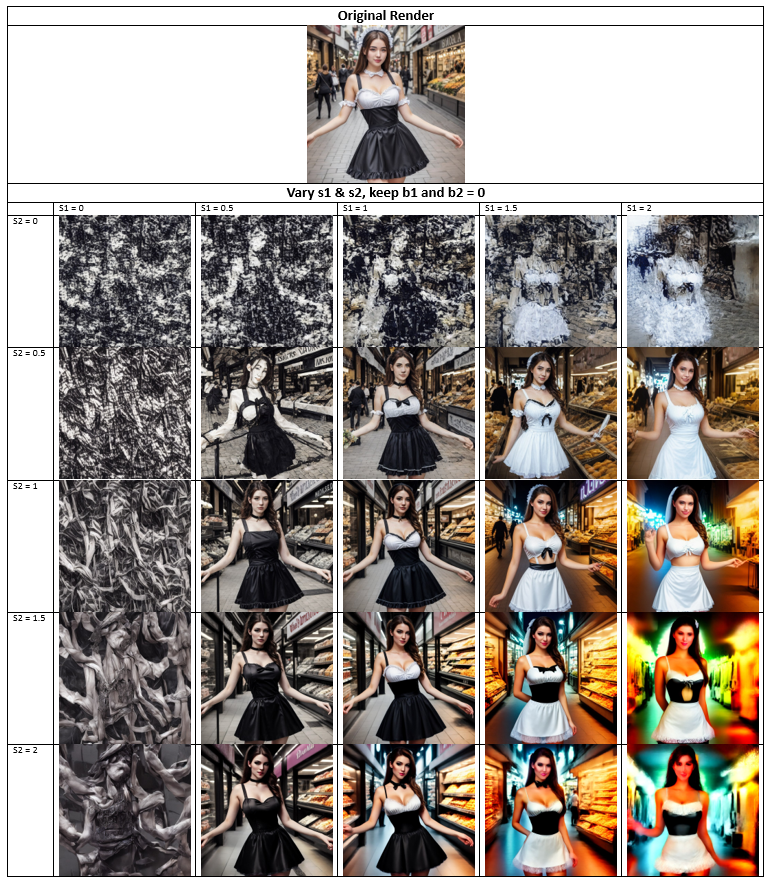
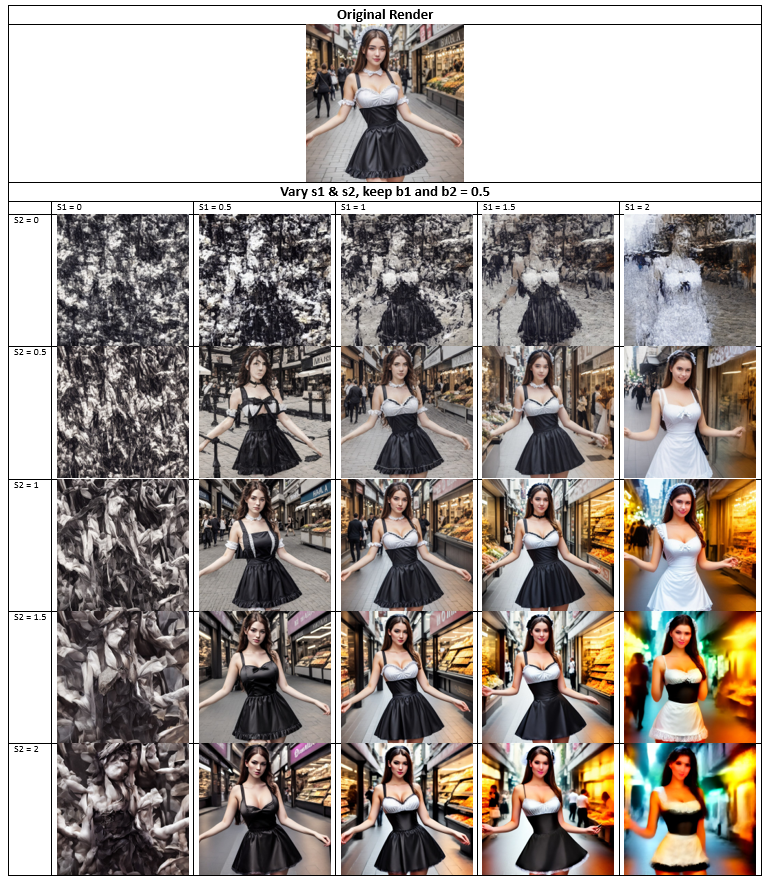
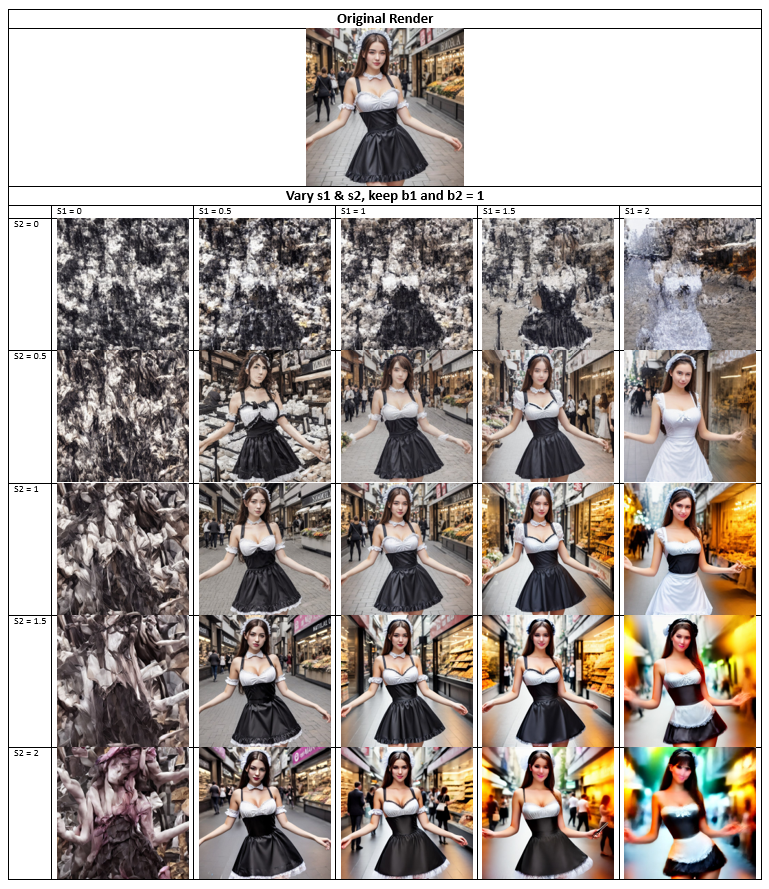
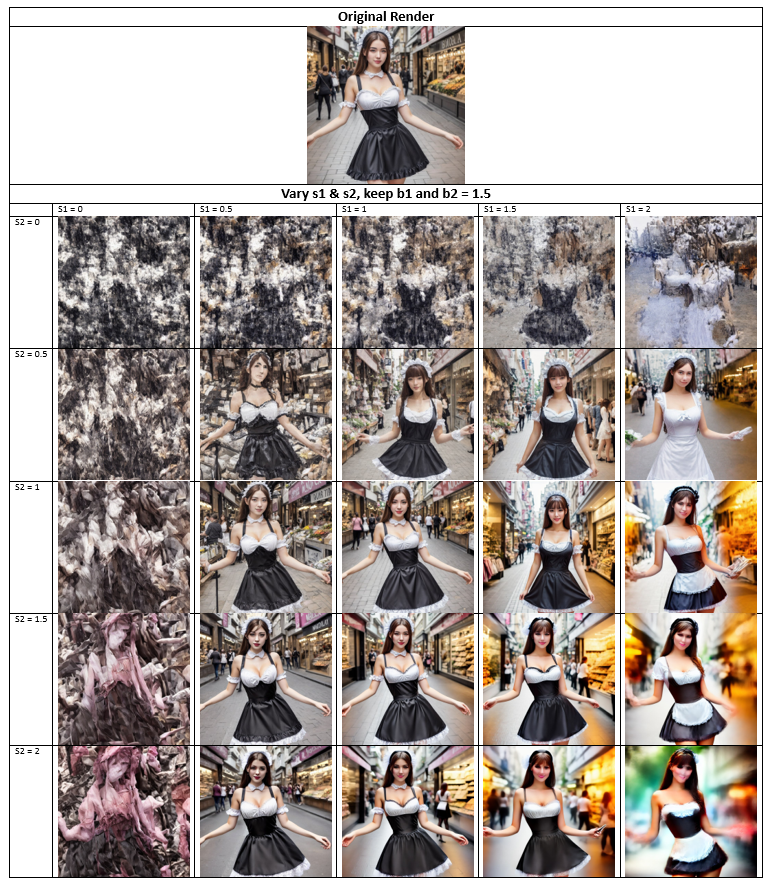
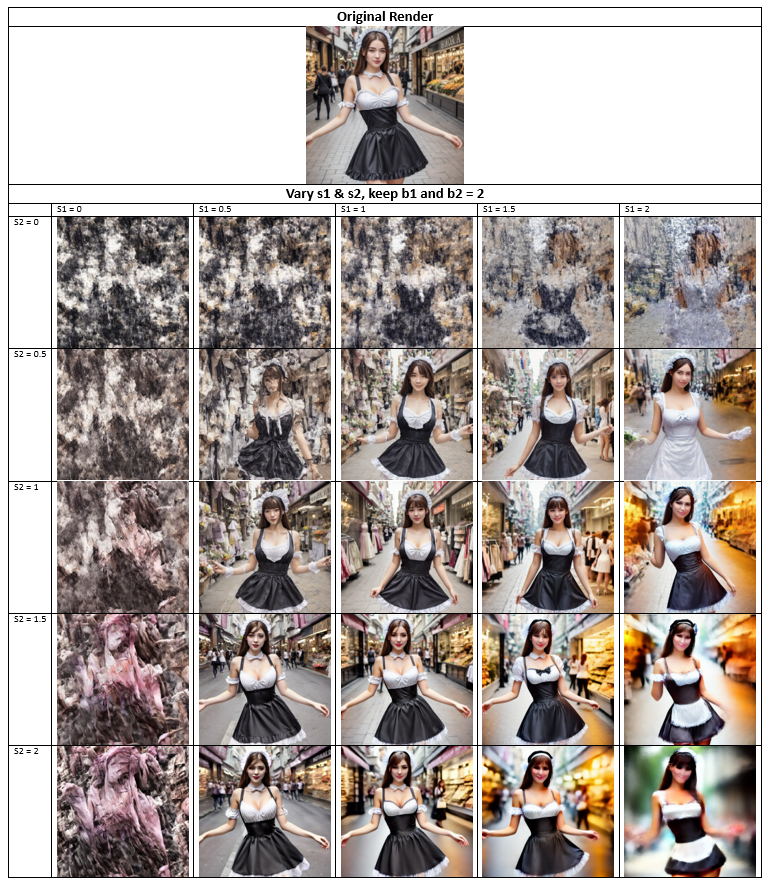
Now, we are going to change the backbone factors while keeping the skip factors constant.


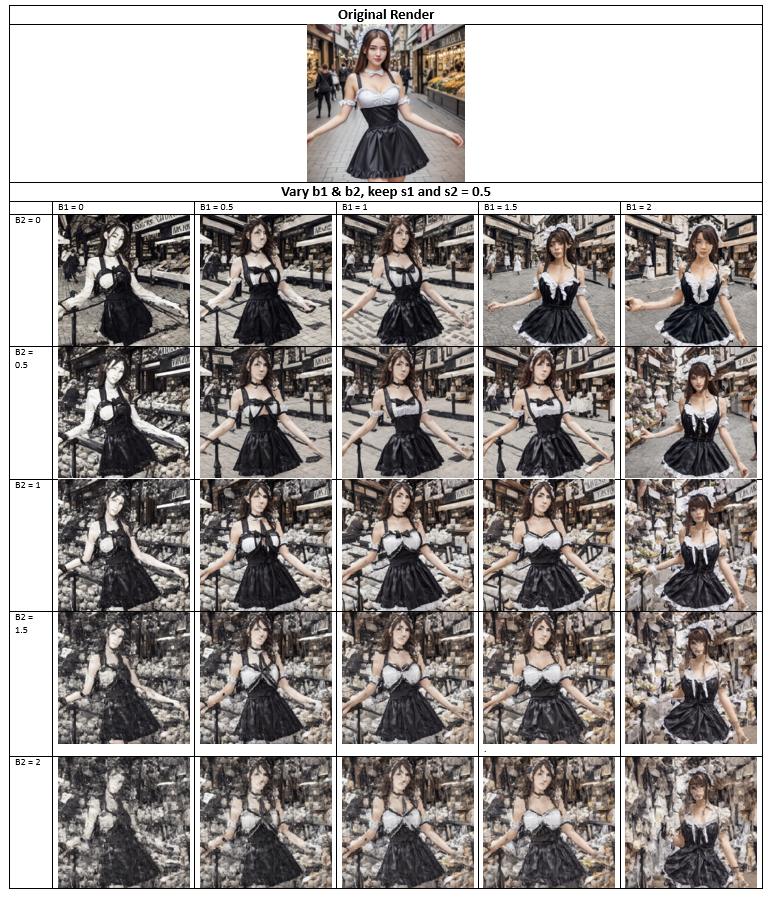
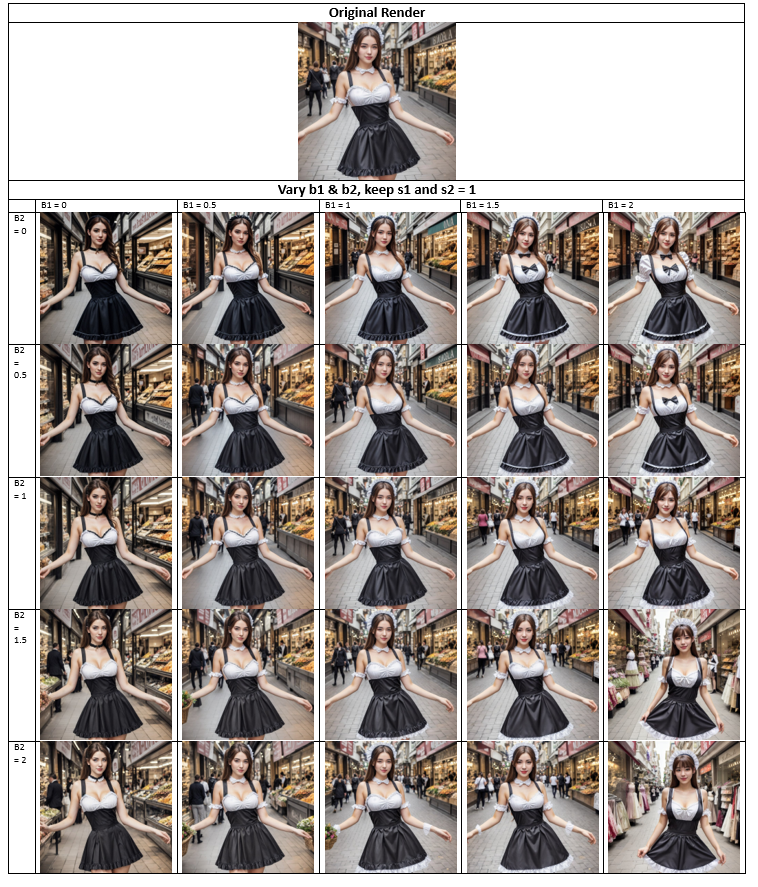
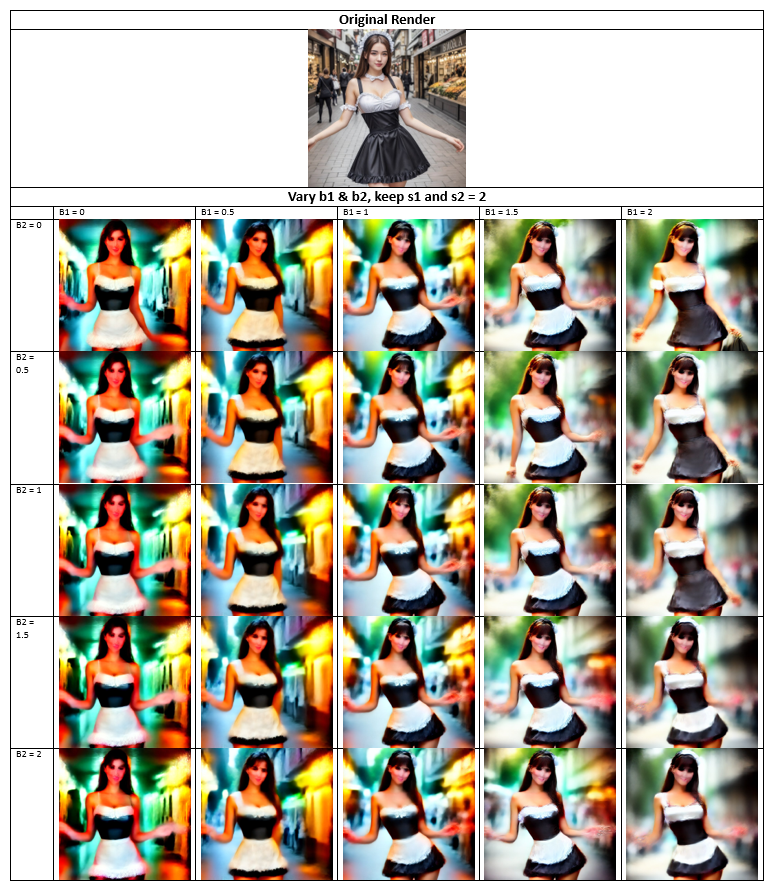
Even though this uses a realistic checkpoint, the trend is still similar if a semi-real or anime-based checkpoint is used. In summary, we can observe the following trend:

a) Changing the skip factors (s1 & s2) affects colours and saturation of the render.

b) Changing the backbone factors (b1 & b2) changes the feature map of the render.

How to change character poses using Stable Diffusion in 3D

THIS ARTICLE IS OVER 1 YEAR OLD – YOU SHOULD USE CONTROLNET INSTEAD


In a hurry? Quick and dirty instructions:

Grab any phone with Telegram. Open this web page, make a quick pose, screenshot it, paste into Pirate Diffusion, then type /remix with a prompt, and it’s done. Check out before and after:

Website-made 3D pose and screenshot:

/remix /size:704×704 /steps:more fantasy concept art, adventurer in armor is jumping over a fantasy town, street, detailed <shaper>

stabby jumping guy
Leave the graph and sky on. Oh no look at those fingers though!
I fixed fingers with /style:fuji “nice anatomy” macro from the realism tutorial

TUTORIAL

In a previous tutorial, we showed you how to /remix very simple drawings into photo realistic masterpieces. We will combine that technique with a browser-based 3D app instead of only drawing the image ourselves.

Setup: Take a moment to think about a simple pose or scene that interests you, and a prompt from a character design at the ready, or just borrow one from this page instead

Step 1: Open any 3D program

I like https://webapp.magicposer.com   (or a phone app, whatever) Their free demo is fine for the purpose of this tutorial.

When it loads, a 3D person will appear with a simple toolbar above.  It works the same on PC. No install or GPU needed, its just a web page.

Step 2: Let’s change the basic body frame

Click on their abs and then click the Replace (top far right, next to last)

Choose a preset to change how their body looks. You can set color and hair options here. The closer you can prep this to your ideal outcome, the better.

Step 3: Click your character again, then then click the Toggle Gear up top to turn off the grid lines, sky, and take off their clothes if you like

Optional: you can Click +Add to add shapes and more characters. 

Step 4: Pose the arms and torso, selecting the squares to move the big body parts, and circles to move the joints. In this program, the Rotate Button only appears when you touch a ball joint, then it turns orange.

You can pull and pinch body parts, but rotating is a different mode. I’ve you’ve never used a 3D program before, it takes some getting used to the separate “rotation” function. If its too hard on mobile, grab a mouse and you can use the mouse wheel to zoom and the right click to click and drag the scene.

Step 5: Position the light source

You’re almost done! Push the yellow arrows where you want the light to come from, and rotate and position it in the same way you moved the joints. Then push it away off the space so you can take a screenshot, so its not on camera.

Step 6: Take a screenshot

Line up your phone for the screenshot, and click on preview. This hides the user interface. You can do it again and turn off the parts you don’t want to see, and fire that screenshot!  You’re done. Minimize the window or open a tab so you don’t lose it.

this is hard
Use colors and light clearly, or the shoulder is going to blend into the arm and then you’re going to fight with it

Every AI struggles with hands and anatomy in general, so try to provide clean poses when possible. In the case of my jumping hero, there is no confusion. In a photo like this, where the right shoulder and forearm look fused, we are asking for trouble. But let’s see what we get anyway.

Here we can observe that it’s not sure what to do what that other hand:

Pace yourself. If you end up with a scene you don’t want, ask /edit to put them in a different situation. If you’re not sure how to do this, read about how to teleport your character into a different scene using seed.

Play with /guidance (-20 to 20) and /strength (0.1 to 1.0) to change hand positions, hair, scenery and more. Here I called the anime style <av4> to start building a hellish scene with a succubus …or do I want Princess Jasmine finding a lamp in the desert? Its easy to change directions on the fly, go for it.

But as your guidance (creativity) increases, the pose may change, so careful.

Did the pose change?  Slide up your guidance and strength to snap it back

Now let’s try a photo instead. Pick up and install Realvis13 from the Early Access channel in PRO, then:

/remix /strength:0.7 a woman doing yoga on the phone at the supermarket <realvis13>

The only limit is your imagination. And tricky shadows fusing limbs together.

kim kardashian in a bikini deepfake
I’m not even mad about the arm moving

/remix /size:704×704 /steps:more beautiful hand model with perfect hands Kim Kardashian takes a selfie at the end of the world, fire and smoke everywhere, ashes ((high detailed skin, 8k uhd, dslr, soft lighting, high quality, film grain, Fujifilm XT3, HD, Sharp)), [[deformed iris, deformed pupils, semi-realistic, cgi, 3d, render, sketch, cartoon, drawing, anime, text, close up, cropped, out of frame, worst quality, low quality, jpeg artifacts, ugly, duplicate, morbid, mutilated, extra fingers, mutated hands, poorly drawn hands, poorly drawn face, mutation, deformed, blurry, dehydrated, bad anatomy, bad proportions, extra limbs, cloned face, disfigured, gross proportions, malformed limbs, missing arms, missing legs, extra arms, extra legs, fused fingers, too many fingers, long neck]] <urpm>

And then /facelift to 4x the pixels and we’re done!

Now you try it, gym clothes optional.

What does Arafed mean in Stable Diffusion? ShowPrompt and the Describe command

What does Arafed mean in Stable Diffusion? ShowPrompt and the Describe command

Ah yes, the mysterious Arafed.  You might see this in prompt outputs or when using our /describe command

“The word “arafed” appears to have multiple meanings in English, derived from its use as both an adjective and a verb. As an adjective, it means “as leisurely” or “as dilatory.” When used as a verb, it translates to “let him/her/it slow”​​

This suggests that the word is related to the concept of slowness or taking one’s time, or being leisurely. Someone having fun

“arafed man in a white robe riding on top of a blue car”


PirateDiffusion Content Guidelines

PirateDiffusion Content Guidelines

Updated 11/16/2023
This content policy is a living document. It is modified based on community feedback. Join us in VIP chat to discuss!

Be cool, be considerate

Our goal is to provide a safe space for many kinds of fantasy content, even if it isn’t everyone’s cup of tea. We cater to many kinds of creators. Our system hosts an extensive library of fantasy and NSFW content from many countries.  We try to strike a good balance of respecting different kinds of viewpoints, cultures, and sexual preferences. We will not remove lawful content that some people find offensive as long as it is lawful.  For example, we have a lot LGBTQ+ content. If that’s something you don’t want to see, we have specific groups for it and you can avoid it. We’re trying to make this work for everyone. That said, there’s a fine line between fantasy content for one’s personal enjoyment and content that might be against the law in your hometown. These content guidelines are for everyone’s protections — ours and yours.

Examples of what’s OK 

We publish a wide range of content that’s also inline with other social media platforms. This keeps our own policies in check for sanity. These subreddits are filled with PirateDiffusion creations:

Weeb stuff

If you can picture a red-face police officer coming over to your house and taking a chunk of time out of their day to deal with what’s on your computer instead of dealing with real criminals, maybe rethink your life priorities.  If the cops don’t care, it’s OK. That’s the rule.

Public figures

Some stuff is fine.  Photoshopped memes of celebrities, some skirting on good taste, have been created since the day the Internet was made. The fact that AI saves a few steps hasn’t changed the law. So because of this, we try to have some leniency. If you really want to see  crazy stuff in your own private space, by all means go ahead. You do you. We will take down any content if asked by that person, of course.

But please do us all a favor: Whatever or Whoever you are into, do it for your own personal enjoyment, in your private drive, and don’t go sharing it on social media for cash or internet points. And that’s the rule — don’t make people feel bad. In the case of sites like Reddit or services like Discord, they’ll ban all of us asap. See rule#1 – Be cool. What is NOT OK is distributing deepfake content, especially porn. In some areas like California this actually carries heavy fines, so please be careful. You can get in trouble with your local area for certain kinds of content. So please, use your common sense. Will Smith eating spaghetti is probably fine.

Consent

We don’t look at your private uploads, but we do block uploads in public groups for your protection. We don’t want to look at your private photos, either. Please don’t upload photos that don’t belong to you, that’s all there is to it.

No underage  Underage prompts trigger an automated nudge to our moderation staff, and we review accounts on a case by case basis to make sure nobody gets in trouble over a false positive.
  • Privately created models using Graydient Catalog / Graydient Model Maker will be scanned
  • 3rd party loaded models from sites like Civitai and Huggingface are also scanned
These are the early days of AI and there’s a lot to discuss and figure out, we’re sensitive to this and don’t kneejerk ban people. We review account intent history. Nude or suggestive images of children will not be tolerated in group or private spaces. It doesn’t matter if its a fake person, real person, illustrated, anime, or 3d cgi, there are laws against this. What specifically isn’t ok:
  • Toddler models of any kind are not allowed
  • Age Slider LoRAs are specifically over-monitored for abuse
  • Loli/JS/JD/JK/etc
  • Iffy chibi/doll models
We’re aware that there are legit use cases for these, but unfortunately some bad eggs ruined it for everyone.

Triggering content

Keep your religious renders private, whatever you believe in. Please think twice about gaslighting cultures, religious people, such as those people whose families have been impacted by the Holocaust, the war in Ukraine, recent immigration policies, and so on. Look, we get it. We all have rendered The Pope wearing something stupid. But it would be in bad taste to take that too far, too often. Beyond the novelty gag here and there, we don’t particularly condone any kind of religious rendering in public groups.  Think twice about rendering:
  • Nationalist themes aka “alternative” history
  • Racist themes and iconography (nazi, etc)
  • Prompts that make fun of minorities
  • Fake News
  • Gore
That said, we don’t really care if you’re making Satanic dance sex raves or hot WW2 waifus in your own private channel. But in a public group, it’s going to trigger someone, so don’t.

Everything else

Case by case. Just use your common sense on what should be public and what is OK in groups and you’ll be fine!

We surely missed some things, so we’ll keep this document updated.

If you see something, say something

We keep all reported incidents private: info@piratediffusion.com


Also see:

Terms of Use and Privacy Policy

Request a model install

We can install models from Huggingface or Civitai for you.  How to check if we already have it:

Search our models collection – and toggle nsfw if applicable. If its not there, we’ll try to add it within 72 hours. 
(Checkpoints, Locon, Lycoris, and SDXL models may require a little more time)


You can also search for models on Telegram, too:

/concepts /search: keywords

example:


1 Year PirateDiffusion Anniversary

Anniversary Update

Pirate Diffusion turns one

To be honest, we weren’t sure if anyone was going to show up, but we’re so happy that you all did. We’ve met so many great creators and it’s a joy to see all of your images everyday.  There are too many people we want to thank to name, so let’s get straight to the drinking. We are celebrating our birthday with a massive list of new features, including a major new product release. 

Here’s a hint:

CORE FIXES

It’s not your imagination, Pirate Diffusion is now much faster. 
 

We’ve upgraded servers, database, and optimized a lot of little things to bring you features like faster infinite scrolling in your archives page and a punchier bot response. Just look at these sexy stats! We have more improvements on the way to bring you even faster service. These upgrades were made possible by our loyal supporters, thank you so much! 

POLLY GPT

Polly is our brand new, hyper smart Large Language Model.  It’s also a drunken pirate parrot with a fowl mouth. It can tell jokes, use Stable Diffusion commands,  help you come up with new prompt keywords, and render images. Polly is only open to our Patrons at this time, and appears on the new menu bar next to Render.  Polly goes live today!

To access the Polly beta, first login to your account.  Pro 15GB members are invited for a limited time, and Plus 30GB members have unrestricted access.

To use it in Telegram, just type /polly like this:

Please note that this is a very early release, and not reflective of the final speed/quality.  Polly is the first agent you’ll meet in our cast of many characters. When our LLM technologies are ready for primetime, you’ll be able to create your own characters and train them, too. Way cool.

WEB UI 2.0 IS COMING

Your personal Stable Diffusion Web UI is currently called your community, which some people found confusing, as most use it solo. We are fixing this by calling things “projects” and the website is “my stable diffusion” so it’s easier to explain. So we are introducing two new logos:

Your WebUI will soon be called Stable2go, as in Stable Diffusion on the go. 


We’re also going to split the tutorials section so WebUI and Telegram tutorials are on separate pages, so our videos and lessons don’t try to cram both in one place.

MORE STORAGE

Graydient Cloud Drive also has a new logo, and now comes in 50GB variants!  We’ve upgraded all 30GB accounts to 50GB for free, you’re welcome!

AVATAR ON DEMAND

Render an image, and set it as your avatar

It’s much easier to tell when you’re logged in now — just glance at your avatar. 

Want a fresh look? Any of your images can be used to set the avatar, like this: You can also set any rendered image as your avatar from either WebUI or Telegram.

It also works within Telegram, just use the new /avatar command.  


FASTER WEBUI RENDER

Progressive rendering is here!  

Before, it waited to receive all of the images. Now it displays them one by one as they render. No more waiting for the whole batch — they pop in one by one. This is trickier to do in Telegram, but we’ll eventually bring it to Telegram as well.

 Now images appear one by one, instead of waiting for whole set.

SEND A RENDER TO TELEGRAM

The render details pane has two new buttons: avatar and send to telegram 

This button puts a short code in your clipboard that will teleport the image to Telegram, so you can start in WebUI and continue in Telegram.  It looks like this:

Paste that into your bot, and it zaps it there. How neat is that?

Remember, you also have the reverse workflow available to you. Any image you create in Telegram will appear in your Web UI’s Archive section, just type /webui in Telegram to find it. 


IMAGE HISTORY

A new graphed Image Evolution family tree

After an image is modified, the evolution link appears at the bottom of the page.  

This gives you a visual journey across the current branch of forked changes, and lets you track back to an old idea easily. 

We’ve also split the Remix Too into positive and negative prompts, and it contains aspect ratio, guidance presets, steps, and image count. 


FACELIFT MODES

WebUI Facelift has caught up to Telegram: You can now choose between anime/illustration, face retouch, or general AI upscale. The “Regular photo” mode will upscale the image without changing the facial details, and the anime mode will boost any kind of digital drawing.  Improve face is trained on realistic faces, so that won’t work well on illustrations. Use the “anime” mode for your art. 

You can also add additional commands before it runs, such as overriding the sampler.


INPAINT UPGRADES

Three new features:

  • No need to redraw masks: 
  • A new radial button for “previous” remembers previous masks within last 7 renders
  • You can now upload images directly into inpaint (top right)
  • You can download your favorite masks and reupload them. 
  • Note: It works best when both images and the mask are the exact same size.

Expanded Tools Menu

We’ve added more tools like /highdef and /more options in WebUI, when you’re looking at a Render. 


These are rolling out slowly this week, look for more button options soon. No ControlNet over WebUI yet, but that’s clearly next. You can use 8 modes of ControlNet via Telegram though, with unlimited presets. And Roop-style FaceSwap! We’re also testing two more face-swapping commands right now, they’ll be in the next update. More superpowers coming.

FAVORITE MODELS

In case you missed it, last week we rolled out the ability to favorite your top concepts.  Just login and click the heart button. It also works in Telegram, as shown below:

IN-BOT MODEL SEARCH

You can now search AI models with this command right within Telegram.

The command is /concepts /search: followed by your keywords, like this:

It looks at our short lora nicknames as well as the full title and creator of the model, so it will help you find those obscure ones.

SDXL READY

In preparation for SDXL, which is unfortunately not backwards compatible with SD 1.5 LoRAs and Textual Inversions, the software now has awareness of Families of Stable Diffusion models.

We’ll save you some grief instead of showing you a crazy error and catch these mismatched conditions.

THREE NEW RECIPES

Recipes are prompt templates created by the community, which you can add to your prompt like a cheat code to summon powerful effects. These three new recipes only include negative textual inversions, so they’re really good short cheat codes for boosting image quality fast. Here’s what they do, in order of intensity

  • #boost – adds very bad negative and a few mild fixer-upper keywords

  • #nfix – adds three powerful negative TIs and upscales images to 1200×1200 (pro users only)

  • #everythingbad – includes over 10 negative TIs, it’s the nuclear option

Try them out today! Add one them to the very start of your prompt for best results. If no base model is selected, it will default to the very excellent <photon> V1. And speaking of models:

MORE MODELS

And of course, we’ve updated our models and have added a ton of content.  

Follow our Announcements channel for updates. See you in the groups!

-Captain Freeman & Tlack305